DIY CNC 007 - Z-Axis Assembly
3.7 هزار بار بازدید -
-
▶ Subscribe to my website
▶ Subscribe to my website (free): https://www.thehardwareguy.co.uk/subs...
▶ CNC Build Page: https://www.thehardwareguy.co.uk/diy-...
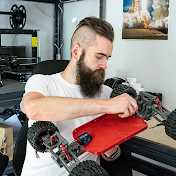
I've just finished assembling the Z Axis, marking the completion of the machining and assembly of the major machine components. The only tasks remaining involve installing and aligning the linear rails for both the X and Y Axis. My reasoning for starting with the Z-Axis was to use it as a fixture to align the X linear rails, and eventually, the entire gantry will serve as a fixture to align the Y linear rails. There's very little left to do now, and I'll soon be installing the necessary hardware to get the machine up and running. For a more detailed update, you can find a video on my YouTube channel via the link below.
00:00 Intro
00:55 Z-Axis Fusion 360 Overview
04:31 Z-Axis Parts and Technical Drawings
07:44 Drilling Stand-Offs & NEMA Plate
09:39 Drilling Backplates and Spindle Mount
13:53 Z-Axis Assembly
35:18 Z-Axis Assembled
36:20 Outro
▶Carveco: https://store-us.carveco.com/?ref=the...
▶DISCOUNT CODE: HWG5OFF
----------------------------------------------------------------------------------------
▶▶ Watch the whole series of videos:
▶ Part 1: DIY CNC 001 - Introduction
▶ Part 2: DIY CNC 002 - Specification & Hardware
▶ Part 3: DIY CNC 003 - Tools for Machining Alu...
▶ Part 4: DIY CNC 004 - Drilling, Counterboring...
▶ Part 5: DIY CNC 005 - Y-Axis Frame Assembly
▶ Part 6: DIY CNC 006 - Gantry Assembly and Bra...
▶ Part 7: DIY CNC 007 - Z-Axis Assembly
▶ Part 8: DIY CNC 008 - Linear Rail Installation
▶ Part 9: DIY CNC 009 - Surface Board, Spindle ...
▶ Part 10: DIY CNC 010 - Closed Loop NEMA Wiring...
▶ Part 11: DIY CNC 011 - VFD and Spindle Test
▶ Part 12: DIY CNC 012 - Electrical Control Box
▶ Part 13: DIY CNC 013 - Configuration & Basic T...
▶ Part 14: DIY CNC 014 - Motor Tuning, Squarenes...
----------------------------------------------------------------------------------------
▶ CNC Build Page: https://www.thehardwareguy.co.uk/diy-...
I've just finished assembling the Z Axis, marking the completion of the machining and assembly of the major machine components. The only tasks remaining involve installing and aligning the linear rails for both the X and Y Axis. My reasoning for starting with the Z-Axis was to use it as a fixture to align the X linear rails, and eventually, the entire gantry will serve as a fixture to align the Y linear rails. There's very little left to do now, and I'll soon be installing the necessary hardware to get the machine up and running. For a more detailed update, you can find a video on my YouTube channel via the link below.
00:00 Intro
00:55 Z-Axis Fusion 360 Overview
04:31 Z-Axis Parts and Technical Drawings
07:44 Drilling Stand-Offs & NEMA Plate
09:39 Drilling Backplates and Spindle Mount
13:53 Z-Axis Assembly
35:18 Z-Axis Assembled
36:20 Outro
▶Carveco: https://store-us.carveco.com/?ref=the...
▶DISCOUNT CODE: HWG5OFF
----------------------------------------------------------------------------------------
▶▶ Watch the whole series of videos:
▶ Part 1: DIY CNC 001 - Introduction
▶ Part 2: DIY CNC 002 - Specification & Hardware
▶ Part 3: DIY CNC 003 - Tools for Machining Alu...
▶ Part 4: DIY CNC 004 - Drilling, Counterboring...
▶ Part 5: DIY CNC 005 - Y-Axis Frame Assembly
▶ Part 6: DIY CNC 006 - Gantry Assembly and Bra...
▶ Part 7: DIY CNC 007 - Z-Axis Assembly
▶ Part 8: DIY CNC 008 - Linear Rail Installation
▶ Part 9: DIY CNC 009 - Surface Board, Spindle ...
▶ Part 10: DIY CNC 010 - Closed Loop NEMA Wiring...
▶ Part 11: DIY CNC 011 - VFD and Spindle Test
▶ Part 12: DIY CNC 012 - Electrical Control Box
▶ Part 13: DIY CNC 013 - Configuration & Basic T...
▶ Part 14: DIY CNC 014 - Motor Tuning, Squarenes...
----------------------------------------------------------------------------------------
55 سال پیش
در تاریخ 1403/04/22 منتشر شده
است.
3,705
بـار بازدید شده